グループIT推進本部 CyberAgent group Infrastructure Unit(以下、CIU)所属の平井( @did0es )です。CIU のサービスの Web フロントエンドの開発に携わっています。
この度、CIU の Web フロントエンドチーム で開発し活用しているコード生成ツールを、オープンソースソフトウェア(以下、OSS)として公開いたしました!(是非 GitHub でスターをいただけると嬉しいです)

https://github.com/CyberAgent/moldable
画像元:https://opengraph.githubassets.com/a8a835442146031206976831ec3d206aa05c099214e204c439909618bf20fbe1/CyberAgent/moldable
本記事では、このソフトウェアの紹介と併せて、開発の背景や何をどのように解決したのかについてお話します。
ソフトウェアの紹介
moldableとは
moldable とはソースコードを生成するための CLI ツールで npm 経由で利用できます。同様のツールとして Plop や Scaffdog, Hygen などが存在します。
moldable の特徴として以下が挙げられます。
- コード生成の設定とテンプレートを、1つの Markdown ファイル内に記述できる
- コード生成の設定は YAML(Markdown の metadata)
- テンプレートはコードブロック
- 既存のコード生成ツールと比べて高速
- 2 〜 3倍ほど速く実行できる
- Windows や Linux, Darwin などでクロスプラットフォームに動作する
既存のツールとのベンチマーク結果は 開発の背景 の項でお話します。
使用例
npm を利用できる環境で、以下でインストールして利用できます。
npm i -g moldableインストール後、moldable を使いたいプロジェクトに移動し .moldable という名前でディレクトリを作成してください。
.
└── .moldable
このディレクトリの中に quick-start.md という名前で、以下のマークダウンファイルを追加してください。
---
name: "quick-start"
description: "Quick Start"
prompts:
  - type: "base"
    name: "name"
    message: "Type your name"
    validate: "{{if eq (len .input) 0}}Name must have more than - characters{{end}}"
  - type: "select"
    name: "favoriteColor"
    message: "Select your favorite color"
    choices:
      - "Red"
      - "Green"
      - "Blue"
actions:
  - type: "add"
    path: "src/quick-start.json"
    template: "quick-start.json"
---

# quick-start.json

```json
{
  "name": "{{.name}}",
  "favoriteColor": "{{.favoriteColor}}"
}
```
.moldable ディレクトリの中で moldable コマンドを実行すると対話型のCLIが起動し、作成したマークダウンファイルが読み込まれます。表示された質問に回答してください。
# Answer the questions
? Select Generator:
  ▸ quick-start - Quick Start

✔  Type your name : John Doe█

?  Select your favorite color :
  ▸ Red
    Green
    Blue

# Results
🖨  Added:
  src/quick-start.json
src ディレクトリに、以下の quick-start.json が生成されれば成功です!
{
  "name": "John Doe",
  "favoriteColor": "Red"
}
このように、moldable は JSON 以外にもあらゆる形式のデータやソースコードを、コマンド1つでテンプレートから生成できます。
開発の背景
CIU のフロントエンドチームは、主にサイバーエージェントのプライベートクラウドである Cycloud のサービスの Web UI・管理画面を開発しています。
これらの開発において、画面の作りは同じで機能が異なるものを実装することが多々ありました。
moldable を作成する以前は、既存の UI を手動で複製し変更を加えてリリースする形で運用していました。
手動による複製は慣れれば早い反面、手順の共有しづらさや機械的な作業の繰り返しによる人為的ミスの発生など、様々な問題が発生します。
機械的な作業を何かしらの手段で代替し、少ない工数で UI を作り上げるべくコード生成ツールの導入から始め、最終的にはツールの内製に踏み切りました。
内製したツールは、Web フロントエンド開発でパッケージマネージャーとして用いている npm 経由で使えるように、Go と TypeScript を組み合わせて npm registry に公開しました。
コード生成における課題
コード生成ツールを内製した動機として、いくつか既存のコード生成ツールを検討し、浮き彫りになった課題を解決したかったことが挙げられます。具体的には、以下の課題の解決を図りました。
1つ目は「実行に時間がかかる」です。
コード生成ツールは、ユーザーの書いたコンフィグとテンプレートを読み込み、オプションを受け取りファイルを書き出すような流れで実行されます。この過程では、コンフィグとテンプレートのパースなどで CPU に負荷がかかり実行速度が低下しがちです。
特に、当初使用していたツールは JS のシングルプロセスな仕組みの上に成り立っていたため、CPU 使用率の高い処理をチューニングするには実装の都合上の限界がありました。
そこで、内製の際は Go の goroutine という言語レベルで提供されている並行実行機能を利用し、パースなどの重い処理を並行で回す(※)ことで速度の向上に取り組んでいます。
※ 一応、Node.js でも Worker threads のような API を用いれば並行実行は可能です。Go を採用する他の理由は後述します。
2つ目は「テンプレートが人間にとって優しいかどうか」です。
例えば、Plop はテンプレートを Handlebars で記述します。この Handlebars は JS によるテンプレートエンジン で .hbs という拡張子のファイルに内容を含めます。
JS ライクな記法で様々な言語のファイルを記述し、データを埋め込んで出し分けられる反面、 エディタのサポートが十分な環境以外での読み書きが難しいものとなっています。
一方、Scaffdog はテンプレートを Markdown で記述します。
Markdown はドキュメントなど、人が読むことを目的として書かれることが多く、エディタのサポートも充実しています。
Handlebars のようなデータの埋め込みを標準だけで行うことはできませんが、他の言語と組み合わせることで実現可能です。
moldable は Scaffdog の仕組みを倣いつつ、より簡単さを意識し、コンフィグも全て1つの Markdown に集約するようになっています。
以上から、moldable は「速く簡単にコードを生成する」ことを目的に開発されています
既存のツールとの比較
この項の表は、以下のような React コンポーネントの生成を、各ツールで 10 回行った実行時間の平均を示しています。
import React from "react";

export const Foo: React.FC = (children: { children: React.ReactNode }) => <div>{children}</div>;| Package | Version | Average time of 10 times(ms) |
|---|---|---|
| plop | 6.2.11 | 0.233 |
| scaffdog | 3.0.0 | 0.385 |
| moldable | 0.0.4 | 0.182 |
Plop や Scaffdog と比較して、2 〜 3倍ほど実行完了までが速いです。なお、計測は CLI を起動してからではなく、対話型環境への値の入力を全て終えた後の、ファイル生成処理にかかる時間だけを測っています。
実装方法
どのようにして moldable を既存ツールよりも速く動くように実装したのか、簡単に説明します。
goroutineによるファイルのロード
moldable のコンフィグとテンプレートのパースを goroutine で実装しました。
// ~~~

  // .moldable フォルダを読み込む
  entries, readDirErr := os.ReadDir(str.BuildPath(".moldable", &wd))
  if readDirErr != nil {
    logger.Error(readDirErr)
  }
  // Markdown ファイルのパスだけに絞り込む
  entries = stream.ArrayFilter(entries, func(entry os.DirEntry, _ int) bool {
    return strings.HasSuffix(entry.Name(), ".md")
  })

  for _, entry := range entries {
    // goroutine
    go func(entry os.DirEntry) {
      // それぞれの Markdown ファイルの内容を読み込む
      path := str.BuildPath(path.Join(".moldable", entry.Name()), &wd)
      file, err := os.ReadFile(path)
      if err != nil {
        logger.Error(err)
      }

      document := markdown.Parser().Parse(text.NewReader(file))
      // コンフィグ部分は metadata として抽出
      metaData := document.OwnerDocument().Meta()

      // テンプレート部分(contents)は Markdown の AST を解析して抽出
      var contents []Content
      var currentContentName string
      var currentContentCode strings.Builder
      ast.Walk(document, func(node ast.Node, entering bool) (ast.WalkStatus, error) {
        if entering {
          switch n := node.(type) {
          case *ast.Heading:
            if currentContentName != "" {
              contents = append(contents, Content{
                name: currentContentName,
                code: currentContentCode.String(),
              })
              currentContentCode.Reset()
            }
            currentContentName = string(n.Text(file))
          case *ast.FencedCodeBlock:
            code := bytes.Buffer{}
            for i := 0; i < n.Lines().Len(); i++ {
              line := n.Lines().At(i)
              code.Write(line.Value(file))
            }
            currentContentCode.WriteString(code.String())
          }
        }
        return ast.WalkContinue, nil
      })
      if currentContentName != "" {
        contents = append(contents, Content{
          name: currentContentName,
          code: currentContentCode.String(),
        })
      }

      // metadata と contents を 1 つにまとめあげて後続の処理に渡す
      templates = append(templates, Template{
        meta:     metaData,
        contents: contents,
      })
      doneToReadFiles <- true
    }(entry)
  }

// ~~~
AST の探索は再帰的に実行されるため、CPU を長時間占領してしまいがちですが、goroutineによってファイルごとに並行で回しており、効率よくパースを行えました。
また、並行処理に関しては Go の標準の機能だけで完結するので、後方互換性も保てる点が良いですね。
クロスプラットフォームな実行ファイルの書き出し
Go のコードをビルドする際、go build にオプションを付与し様々な OS 向けに出し分けられます。
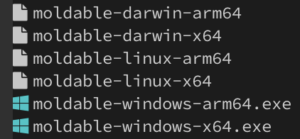
moldable は Windows, Linux, macOS の arm64, x64 版での利用を見越して、以下の Make でビルドしました。
GO_FILES = $(shell find . -name "*.go")
PKG_VERSION = $(shell jq -r .version package.json)

.PHONY: build
build: build-darwin-arm64 build-darwin-x64 build-linux-arm64 build-linux-x64 build-windows-arm64 build-windows-x64

.PHONY: build-darwin-arm64
build-darwin-arm64:
	GOOS=darwin GOARCH=arm64 go build -o ./dist/moldable-darwin-arm64 -ldflags "-X github.com/CyberAgent/moldable/src/cmd.pkgVersion=$(PKG_VERSION)"

.PHONY: build-linux-arm64
build-linux-arm64:
	GOOS=linux GOARCH=arm64 go build -o ./dist/moldable-linux-arm64 -ldflags "-X github.com/CyberAgent/moldable/src/cmd.pkgVersion=$(PKG_VERSION)"

.PHONY: build-windows-arm64
build-windows-arm64:
	GOOS=windows GOARCH=arm64 go build -o ./dist/moldable-windows-arm64.exe -ldflags "-X github.com/CyberAgent/moldable/src/cmd.pkgVersion=$(PKG_VERSION)"

.PHONY: build-darwin-x64
build-darwin-x64:
	GOOS=darwin GOARCH=amd64 go build -o ./dist/moldable-darwin-x64 -ldflags "-X github.com/CyberAgent/moldable/src/cmd.pkgVersion=$(PKG_VERSION)"

.PHONY: build-linux-x64
build-linux-x64:
	GOOS=linux GOARCH=amd64 go build -o ./dist/moldable-linux-x64 -ldflags "-X github.com/CyberAgent/moldable/src/cmd.pkgVersion=$(PKG_VERSION)"

.PHONY: build-windows-x64
build-windows-x64:
	GOOS=windows GOARCH=amd64 go build -o ./dist/moldable-windows-x64.exe -ldflags "-X github.com/CyberAgent/moldable/src/cmd.pkgVersion=$(PKG_VERSION)"
make build を実行すると、6種類の実行ファイルが出力されます。

TypeScriptを用いたコマンド化
今回は Go ではなく、JS や TS を使う環境での使用を目的としているので、npm registry に publish できる形に実行ファイルをラップします。
実装としては、Node.js のモジュールで OS や CPU Architecture を判別して実行ファイルを出し分けます。また、CLI にする必要があるので、以下のような shebang としました。
#! /usr/bin/env node

import child_process from "child_process";
import path from "path";

export function getBinaryPath() {
  const availablePlatforms = ["darwin", "linux", "windows"];
  const availableArchs = ["x64", "arm64"];

  const { platform: pf, arch } = process;
  let platform: string = pf;
  if (pf === "win32") {
    platform = "windows";
  }
  const ext = platform === "windows" ? ".exe" : "";

  if (!availablePlatforms.includes(platform)) {
    console.error(`Moldable does not presently support ${platform}.`);
    return "";
  }
  if (!availableArchs.includes(arch)) {
    console.error(`Moldable does not presently support ${arch}.`);
    return "";
  }

  const binaryFile = `moldable-${platform}-${arch}${ext}`;

  return path.resolve(__dirname, binaryFile);
}

export function run() {
  child_process.execFileSync(getBinaryPath(), process.argv.slice(2), { stdio: "inherit" });
}

run();
(余談)Benchmarkのスクリプト
余談で、eslint-interactive の E2E テストを参考に moldable やその他ツールに対するベンチマークを記述しました。
/**
 * Inspired by https://github.com/mizdra/eslint-interactive/blob/a5ab787c4ccc780a2999b88d59d719cd6c1e651d/e2e-test/global-installation/index.test.ts
 */
"use strict";

const { spawn } = require("child_process");
const { rimraf } = require("rimraf");
const { mkdirp } = require("mkdirp");

const FILE_NAME = "for-benchmark";
const MAX = 10;

const LF = String.fromCharCode(0x0a); // \n
const DOWN = String.fromCharCode(0x1b, 0x5b, 0x42); // ↓
const ENTER = String.fromCharCode(0x0d); // enter

async function wait(ms) {
  return new Promise((resolve) => setTimeout(resolve, ms));
}

async function clear() {
  await rimraf("./src");
  await mkdirp("./src");
}

async function bench(type) {
  if (type === "plop") {
    const plop = spawn("./node_modules/.bin/plop");
    await wait(1000);
    plop.stdin.write(FILE_NAME);
    await wait(1000);
    const plopMeasureStart = performance.now();
    plop.stdin.write(LF);
    const plopMeasureEnd = performance.now();
    return plopMeasureEnd - plopMeasureStart;
  }

  if (type === "scaffdog") {
    const scaffdog = spawn("./node_modules/.bin/scaffdog", ["generate"]);
    await wait(1000);
    scaffdog.stdin.write(LF);
    await wait(1000);
    scaffdog.stdin.write(DOWN);
    await wait(1000);
    scaffdog.stdin.write(ENTER);
    await wait(1000);
    scaffdog.stdin.write(FILE_NAME);
    await wait(1000);
    const scaffdogMeasureStart = performance.now();
    scaffdog.stdin.write(LF);
    const scaffdogMeasureEnd = performance.now();
    return scaffdogMeasureEnd - scaffdogMeasureStart;
  }

  if (type === "moldable") {
    const moldable = spawn("./node_modules/.bin/moldable");
    await wait(1000);
    moldable.stdin.write(LF);
    await wait(1000);
    moldable.stdin.write(FILE_NAME);
    await wait(1000);
    const moldableMeasureStart = performance.now();
    moldable.stdin.write(LF);
    const moldableMeasureEnd = performance.now();
    return moldableMeasureEnd - moldableMeasureStart;
  }

  return 0;
}

(async () => {
  const type = process.argv[2];

  const results = [];
  for (let i = 0; i < MAX; i++) {
    const result = await bench(type);
    console.log(`[${type}] ${i + 1} time: ${result}ms`);
    results.push(result);
    await clear();
  }

  console.log(
    `[${type}] average time of 10 times: ${results.reduce((acc, cur) => acc + cur, 0) / MAX}ms`
  );

  process.exit(0);
})();
node benchmark.js moldable のように、与えた引数に応じてツールの実行時間を計測します。
実際の計測に使用したプロジェクトは こちら からご覧になれます。
おわりに
CIU Webフロントエンドチームが開発した moldable というコード生成ツールの紹介でした。コード生成ツール導入の動機から内製に至った経緯や内製の方法まで、何かの参考になれば幸いです。
併せて、このツールを実際に使っていただいて疑問に思った点やバグの起票、修正や機能追加などの コントリビュート もお待ちしております!
また、既存のコード生成ツールを元に moldable の開発が行えました。この場を借りて、それぞれのツールの開発者に感謝申し上げます。
以下はコードを借用、改変させていただいたライブラリのライセンスです。ライセンスの内容は こちら からもご覧になれます。
- Plop( MIT License )
- Scaffdog( MIT License )
- eslint-interactive( MIT License )
ご精読いただきありがとうございました!
