この記事は CyberAgent Developers Advent Calendar 2023 22日目の記事です。
はじめに
はじめまして、極AI事業部の宮西です。
この記事では、簡単な例で「生成AI」の中身を可視化したいと思います。
前提
モチベーション
総じて、機械学習モデルを用いたサービスでは、モデルそのものが必ずしも人間の論理で動いていないため、テストやデバッグが難しいという課題があります。
生成AIも例外ではなく、むしろモデルの巨大化に伴い複雑性は増す一方なので、
- 公開されているモデルなら、中身を見て品質の担保に使えないか?
- OpenAI APIなど非公開なモデルを使う場合でも、動作確認をどうにかできないか?
という大きな疑問に対する小さな一歩にできないか、というのがモチベーションです。
「生成AI」とは
定義の仕方は色々あると思いますが、ここでは「テキスト・画像・動画など、指示の下に人間に理解可能な何かを生成できるAI≒機械学習モデル」くらいに考えておいてください。なお非公開なモデルの場合「中身が一つの機械学習モデルか」は不明であり、こちらはモデルというよりサービスと呼ぶべき存在ですが、ここでは同列に語ります。
まとめるとこんな感じです。
- 非公開なモデルの例
- テキスト;ChatGPT (GPT-4)、画像:MidJourney、動画:Gen-2、テキスト+画像:GPT-4V
- 公開されているモデルの例
- テキスト:OpenCALM・Llama、画像:Stable Diffusion、動画:Stable Video Diffusion、テキスト+画像:LLaVA
中身を確かめてみた
問題設定
最近GPT-4Vが話題になっているので、同じテキスト+画像で公開されているモデルのLLaVAを使ってみました。
有志が公開しているGoogle Colaboratoryのnotebookから、130億パラメータのものを使用しています。
量子化のおかげか、推論だけであればcolabデフォルトのT4 GPUで動きます(量子化なしのものはA100が必要でした)。
コードと結果
上述のnotebookはそのまま動きますが、少しだけ修正します。最初に、再現性のために確率的サンプリングをオフにします。
before
def caption_image(image_file, prompt):

[中略]

        output_ids = model.generate(input_ids, images=image_tensor, do_sample=True, temperature=0.2,
after
def caption_image(image_file, prompt):

[中略]

        output_ids = model.generate(input_ids, images=image_tensor, do_sample=False,
また、LLaVAの応答が横に長くなってしまうので、可読性のために文ごとに改行します。
before
print(output)
after
print(".\n".join(output.split("."))[:-1])そのまま動かすとこうなります。

次に、Describe the image and color details.という指示のcolorを抜いてDescribe the image in details.にしてみます。

確かに色の情報が落ちつつ、同程度の記述量があるように見えます。token数もほとんど同じです。

次にattentionを抽出してみます。model.generateのparameterを追加するだけです。ついでに理解のため幾つかの中間変数を出力してみます。
before
def caption_image(image_file, prompt):

[中略]

        output_ids = model.generate(input_ids, images=image_tensor, do_sample=False,

[中略]

        return image, output
after
def caption_image(image_file, prompt):

[中略]

        outputs_all = model.generate(input_ids, images=image_tensor, do_sample=False, output_attentions=True, return_dict_in_generate=True,
        output_ids, attentions = outputs_all["sequences"].to("cpu"), outputs_all["attentions"]

[中略]

        return image, output, attentions, output_ids.to("cpu"), input_ids.to("cpu"), raw_prompt, image_tensor.to("cpu")
attention matrixは通常token数*token数の要素数を持ちますが、このモデルの場合attentionの要素はoutput_ids(大体言語情報)+image_tensor(画像情報)より長いです。

コードを辿ると、このモデルでは上述の変数がそのまま入力になるのではなくprepare_inputs_labels_for_multimodalという関数で埋め込みを作成しているようです。
この関数の結果と比較するとattention matrixの要素数と一致します。

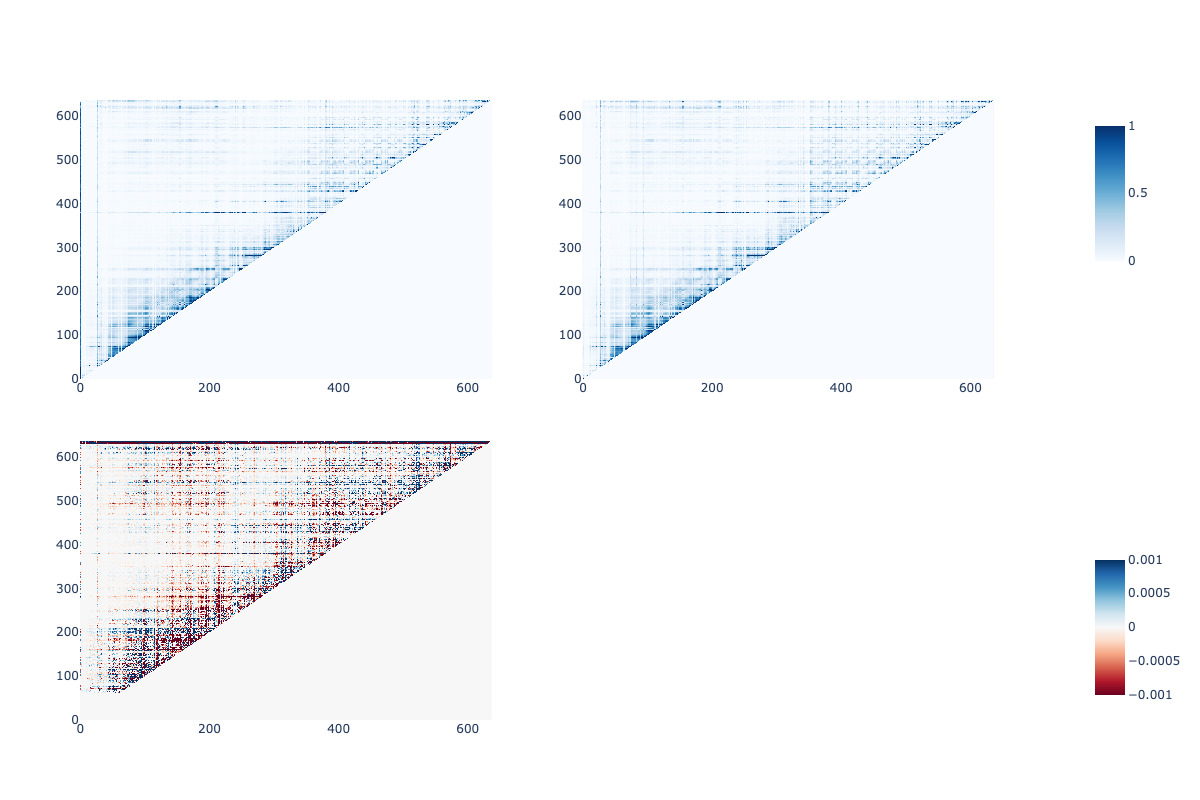
可視化という意味ではBertVizなどのようにtoken単位にするのが最も直感的なのですが、時間の関係で適当な手法でattention matrixの違いを可視化してみます。今回はヒートマップにしてみます。
import numpy as np
import plotly.graph_objects as go
from plotly.subplots import make_subplots
from sklearn.preprocessing import MinMaxScaler, normalize

# 最後のlayer / headを取り出し、plotly用に型変更します
attention1, attention2 = attentions[0][-1][0][-1].detach().cpu().numpy().astype(float), attentions2[0][-1][0][-1].detach().cpu().numpy().astype(float)
# サイズが微妙に違うので、ここでは最初の637要素で比較してみます
attention1_init = attention1[:attention2.shape[0],:attention2.shape[-1]]
pprint([attention1_init.shape, attention2.shape])
# normalizeして相対的な大小を見ることにします
scaler = MinMaxScaler()
stacked = np.vstack((attention1_init, attention2))
scaler.fit(stacked)
attention1_init_norm = scaler.transform(attention1_init)
attention2_norm = scaler.transform(attention2)

cbarlocs = [.85, .15]
fig_A = go.Figure(data=go.Heatmap(z=attention1_init_norm, zmin=0, zmax=1, colorscale="Blues", colorbar=dict(len=0.25, y=cbarlocs[0])))
fig_A.update_layout(title="prompt変更前(色情報有)")
fig_B = go.Figure(data=go.Heatmap(z=attention2_norm, zmin=0, zmax=1, colorscale="Blues", showscale=False))
fig_B.update_layout(title="prompt変更後(色情報無)")
att_diff = attention1_init_norm - attention2_norm
fig_C = go.Figure(data=go.Heatmap(z=att_diff, zmin=-0.001, zmax=0.001, colorscale="RdBu", colorbar=dict(len=0.25, y=cbarlocs[1])))
fig_C.update_layout(title="差分")

fig = make_subplots(rows=2, cols=2, vertical_spacing=0.1, horizontal_spacing=0.1)
fig.add_trace(fig_A.data[0], row=1, col=1)
fig.add_trace(fig_B.data[0], row=1, col=2)
fig.add_trace(fig_C.data[0], row=2, col=1)
fig.update_layout(width=1200, height=800)

fig.update_traces(colorbar=dict(title_font=dict(size=14),tickfont=dict(size=12),x=1.1))
fig.show()
大体の傾向は同じですが、差分も多少はある、という感じです。

まとめ
簡単な例ではありますが、attentionと入出力の関係が垣間見えました。
ChatGPTなどではモデルの中身を見ることはできませんが、入出力の対応から仮説を立ててpromptの改善案を考えたりと、生成AIに関わる際には同様のプロセスを踏む必要がある場面は多々あります。
少しでも参考になれば嬉しく思います。
